


前言
[本文档长期更新中……]
设计模式曾经是国内开发界中一个很火热的概念
提及软件必谈架构;提及开发必谈模式
在所谓的潮流之后,是计算机行业对于新鲜事物的过渡吹捧
但是这些东西真的是新鲜的吗?
今天我们简要的谈一谈什么是设计模式,它又可以使用在什么地方
所谓的设计模式,其实可以理解为开发层面的软件书写套路
他可以通过传授和总结一些书写技巧,帮助我们在写项目的时候呈现更好的代码复用性和扩展性
至于可读性?
鉴于九成的程序员都不写、不更新注释,这个不在讨论范围之内-v-
鉴于以上内容,设计模式仅仅需要掌握常见的部分即可,不用死记细节,毕竟咱随时可以定义一个新模式
基础概念
设计模式的几大特性:
关于设计性的原则:
开放-封闭原则:你应该拥抱变化,但是仍坚守自己【留下对未来业务的兼容性,并不允许修改已有的功能】
里氏替换原则:一代应该比一代强【子类应该可以替代父类干活】
关于低耦合的原则:
合成/聚合复用原则:合伙比赠与更高效【少用继承,多用聚合】
迪米特法则:保持社交距离【不用直接通信的类不应当有任何的直接接触】
单一职责原则:少管闲事【一个类只应当负责一种功能】
四大类型
1.创建型模式
创建型模式,很简单,就是将创建一个对象的代码给封装起来,反复、花式调用
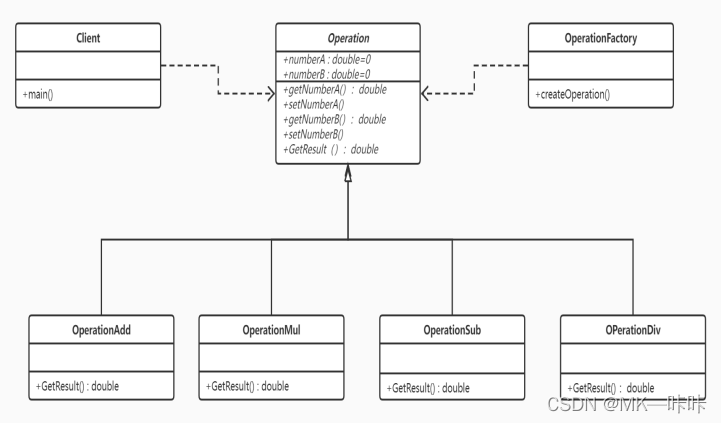
1.1工厂模式(简单、抽象)
我们先看一下总的工厂模式的思想,
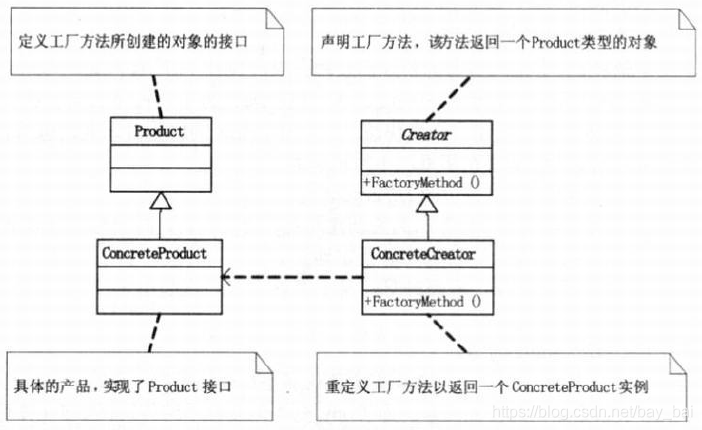
简单工厂:
简单工厂,其实就是将一个创建单一的一类对象A的过程打包,
由于这个对象会被频繁创建,所以利用一个类(简单工厂类)实现一个函数,在函数里面创建
然后我们创建一个简单工厂类,就可以调用这个函数创建这个对象A了。
当然,多个函数就可以创建多个不同对象。
以下是他的uml:
同样,我们给出一份简单的示例代码:
#include <iostream>
#include <string>
#include <memory>
using namespace std;
class product
{
public:
    product() {};
    int val;
    virtual int GetVal() = 0;
    virtual void CoutVal() = 0;
};

class productA :public product
{
public:
    productA(int inum){
        val = inum;
    };
    int GetVal() override{
        return val;
    }
    void CoutVal() override{
        cout << "productA val:" << GetVal() << endl;
    }
};

class productB :public product
{
public:
    productB(int inum){
        val = inum;
    };
    int GetVal() override{
        return val;
    }
    void CoutVal() override {
        cout << "productB val:" << GetVal() << endl;
    }
};

class productC :public product
{
public:
    productC(int inum){
        val = inum;
    };
    int GetVal() override{
        return val;
    }
    void CoutVal() override {
        cout << "productC val:" << GetVal() << endl;
    }
};

template  <class T>
class simple_factory
{
public:
    std::shared_ptr<T> CreatePrd(string istr)
    {
        int param = 0;
        if (istr == "A") {
            param = 1;
            return std::make_shared<productA>(productA(param));
        }
        else if (istr == "B") {
            param = 2;
            return std::make_shared<productB>(productB(param));
        }
        else if (istr == "C"){
            param = 3;
            return std::make_shared<productC>(productC(param));
        }
        else {
            return nullptr;
        }
    }

    product* CreatePrd1(string istr)
    {
        if (istr == "A"){
            return new productA(1);
        }
        else if (istr == "B"){
            return new productB(2);
        }
        else if (istr == "C") {
            return new productC(3);
        }
        else {
            return nullptr;
        }
    }
};

int main()
{
    simple_factory<product> FAC;
    auto pa=FAC.CreatePrd("A");
    auto pb = FAC.CreatePrd("B");
    auto pc = FAC.CreatePrd("C");

    if (pa && pb && pc) {
          pa->CoutVal();
          pb->CoutVal();
          pc->CoutVal();
    }
    getchar();
}
抽象工厂:
抽象工厂不再满足于创建一个固定的一类对象A,而是想要见招拆招的创建对象like A,对象like B
所以我们也需要为这对象提供不同的工厂类,那为什么不在一个工厂里面用不同的流水线(函数)完成这一创建过程呢
我们需要控制一个工厂的大小,如果某一个工厂太过臃肿,那就是真的大而不能倒了……
以下是他的uml:
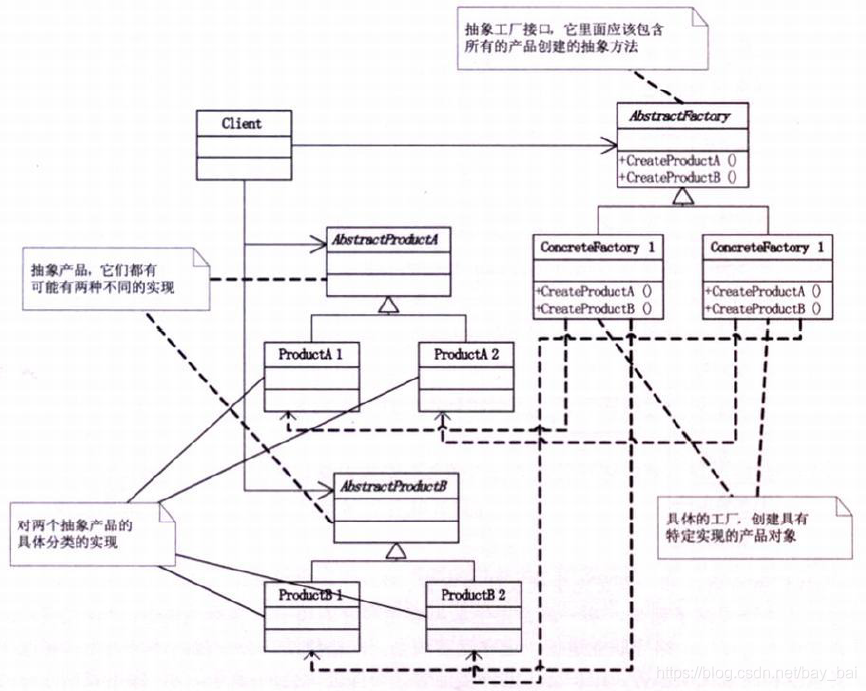
我们还是照例使用一段示例代码来体会一下:
#include <iostream>
#include <string>
#include <memory>
using namespace std;

class product
{
public:
    product() {};
    int val;
    virtual int GetVal() = 0;
    virtual void CoutVal() = 0;
};

class productA :public product
{
public:
    productA(int inum)
    {
        val = inum;
    };
    int GetVal() override
    {
        return val;
    }
    void CoutVal() override
    {
        cout << "productA val:" << GetVal() << endl;
    }
};

class productB :public product
{
public:
    productB(int inum)
    {
        val = inum;
    };
    int GetVal() override
    {
        return val;
    }

    void CoutVal() override
    {
        cout << "productB val:" << GetVal() << endl;
    }
};

class productC :public product
{
public:
    productC(int inum)
    {
        val = inum;
    };
    int GetVal() override
    {
        return val;
    }

    void CoutVal() override
    {
        cout << "productC val:" << GetVal() << endl;
    }
};

class machine
{
public:
    machine() {};
    int val;
    virtual int GetVal() = 0;
    virtual void CoutVal() = 0;
};
class machineA :public machine
{
public:
    machineA(int inum)
    {
        val = inum;
    };
    int GetVal() override
    {
        return val;
    }
    void CoutVal() override
    {
        cout << "machineA val:" << GetVal() << endl;
    }
};
class machineB :public machine
{
public:
    machineB(int inum)
    {
        val = inum;
    };
    int GetVal() override
    {
        return val;
    }
    void CoutVal() override
    {
        cout << "machineB val:" << GetVal() << endl;
    }
};
class machineC :public machine
{
public:
    machineC(int inum)
    {
        val = inum;
    };
    int GetVal() override
    {
        return val;
    }
    void CoutVal() override
    {
        cout << "machineC val:" << GetVal() << endl;
    }
};

template  <class T>
class abstract_factory
{
public:
    virtual std::shared_ptr<T> CreatePrd(string istr) = 0;
    virtual std::shared_ptr<T> CreateMach(string istr) = 0;
};

template  <class T>
class prd_factory :public abstract_factory<T>
{
public:
    std::shared_ptr<T> CreatePrd(string istr) override
    {
        int param = 0;
        if (istr == "A")
        {
            param = 1;
            return std::make_shared<productA>(productA(param));
        }
        else if (istr == "B")
        {
            param = 2;
            return std::make_shared<productB>(productB(param));
        }
        else if (istr == "C")
        {
            param = 3;
            return std::make_shared<productC>(productC(param));
        }
        else
        {
            return nullptr;
        }
    }

    std::shared_ptr<T> CreateMach(string istr) override
    {
        return nullptr;
    };
};

template  <class T>
class mach_factory :public abstract_factory<T>
{
public:
    std::shared_ptr<T> CreatePrd(string istr) override
    {
        return nullptr;
    }

    std::shared_ptr<T> CreateMach(string istr) override
    {
        int param = 0;
        if (istr == "MA")
        {
            param = 4;
            return std::make_shared<machineA>(machineA(param));
        }
        else if (istr == "MB")
        {
            param = 5;
            return std::make_shared<machineB>(machineB(param));
        }
        else if (istr == "MC")
        {
            param = 6;
            return std::make_shared<machineC>(machineC(param));
        }
        else
        {
            return nullptr;
        }
    }
};

int main()
{
    string conf = "product";
    if (conf == "machine")
    {
        mach_factory<machine> FAC;
        auto pa = FAC.CreateMach("MA");
        auto pb = FAC.CreateMach("MB");
        auto pc = FAC.CreateMach("MC");

        if (pa && pb && pc)
        {
            pa->CoutVal();
            pb->CoutVal();
            pc->CoutVal();
        }
    }
    else if (conf == "product")
    {
        prd_factory<product> FAC;
        auto pa = FAC.CreatePrd("A");
        auto pb = FAC.CreatePrd("B");
        auto pc = FAC.CreatePrd("C");

        if (pa && pb && pc)
        {
            pa->CoutVal();
            pb->CoutVal();
            pc->CoutVal();
        }
    }

    getchar();

}
1.2单例模式
单例模式,顾名思义,就是只允许发生一次的模式
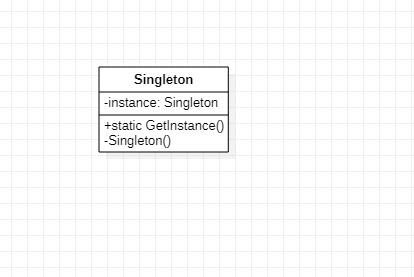
具体来说,就是一个类能且仅能被实例化一次,通常用来实现一个特殊的全局类
我们常用的实现单例类的步骤是:
1.隐藏原有的构造函数
2.提供新的创建接口
3.在接口中判定是否已经有实现(单例判定)
4.考虑多线程的单例(double check+乱序执行优化)
我们还是给出单例的实例案例供参考:
class singleton {
private:
    singleton() {}

    static singleton *p;
    static mutex lock_;
public:
    singleton *instance();
    // 实现一个内嵌垃圾回收类
    class CGarbo
    {
    public:
        ~CGarbo()
        {
            if(singleton::p)
                delete singleton::p;
        }
    };
    // 所谓的垃圾回收,就是定义一个静态的类,类里面只有一个方法,这个方法检查singleton::p是否是空,不是空,执行delete
    // 由于是静态的方法,程序会自动的释放该对象,从而达到自动回收的机制。
    static CGarbo Garbo; // 定义一个静态成员变量,程序结束时,系统会自动调用它的析构函数从而释放单例对象
};

singleton *singleton::p = nullptr;
singleton::CGarbo Garbo;

singleton* singleton::instance() {
    //double check
    if (p == nullptr) {
        lock_guard<mutex> guard(lock_);
        if (p == nullptr)
            p = new singleton();
    }
    return p;
}

//考虑乱序执行
// method 1 operator new + placement new
singleton *instance() {
    if (p == nullptr) {
        lock_guard<mutex> guard(lock_);
        if (p == nullptr) {
            singleton *tmp = static_cast<singleton *>(operator new(sizeof(singleton)));
            new(tmp)singleton();
            p = tmp;
        }
    }
    return p;
}
placement new它的功能就是 在一个 已经分配好的空间上,调用构造函数,创建一个类。
new的功能分为****operator new*和*placement new****,我们做的就是为了防止这两步乱了,我们就自己去把它分开写就行了
1.3装饰模式
装饰模式,就像装修房子一样,本来都是一样的清水房,通过装修就可以赋予他们新的功能。

它和抽象工厂的差异是,抽象工厂要添加功能,就需要继承并扩展功能(重新生成一个工厂)
而装饰类是一个施工队,你把产品给我,我来处理,更多的是一种聚合使用的方式扩展功能
同样,我们给出代码实例:
//抽象组件类-饮料(要生产的东西)
class Beverage
{
public:
	Beverage() :m_description("Unknown Beverage"){}
	virtual std::string getDescription(){ return m_description; }
	virtual double cost() = 0;
protected:
	std::string m_description;
};
//抽象装饰者类-调料,继承自饮料类(扩展原来工厂的类)
class CondimentDecorator :public Beverage
{
public:
	CondimentDecorator(Beverage* berverge)
		:m_beverage(berverge){}
	virtual std::string getDescription() = 0;//定义成纯虚函数,是为了强制子类实例化时必须实现它。
protected:
	Beverage* m_beverage;
};
//三个具体组件(具体需要生产的类)
class DarkRoast :public Beverage
{
public:
	DarkRoast()	{
		m_description = "DarkRoast";
	}
	double cost(){
		return 2.99;
	}
};
class Espresso :public Beverage
{
public:
	Espresso(){
		m_description = "Espresso";
	}
	double cost(){
		return 1.99;
	}
};
class HouseBlend :public Beverage
{
public:
	HouseBlend(){
		m_description = "HouseBlend";
	}
	double cost(){
		return 0.89;
	}
};
//两个具体装饰者(两个施工队)
class Mocha :public CondimentDecorator
{
public:
	Mocha(Beverage* beverage) :CondimentDecorator(beverage){}
	std::string getDescription(){
		return  m_beverage->getDescription() + " Mocha";
	}
	double cost(){
		return 0.2 + m_beverage->cost();
	}
};
class Milk :public CondimentDecorator
{
public:
	Milk(Beverage* beverage) :CondimentDecorator(beverage){}
	std::string getDescription(){
		return  m_beverage->getDescription() + " Milk";
	}
	double cost(){
		return 0.5 + m_beverage->cost();
	}
};
//测试代码
int main()
{
	//不加调料的Espresso
	Beverage* beverage = new Espresso();
	std::cout << beverage->getDescription() << " ¥" << beverage->cost() << std::endl;
	//加双倍摩卡和奶泡的DarkRoast
	Beverage* beverage2 = new DarkRoast();
	beverage2 = new Mocha(beverage2);//调用施工队,装饰产品
	beverage2 = new Mocha(beverage2);//调用施工队
	beverage2 = new Milk(beverage2);//调用施工队
	std::cout << beverage2->getDescription() << " ¥" << beverage2->cost() << std::endl;
	//加双倍奶泡的和一份摩卡的HouseBlend
	Beverage* beverage3 = new HouseBlend();
	beverage3 = new Mocha(beverage3);
	beverage3 = new Milk(beverage3);
	beverage3 = new Milk(beverage3);
	std::cout << beverage3->getDescription() << " ¥" << beverage3->cost() << std::endl;
	system("pause");
	delete beverage;
	delete beverage2;
	delete beverage3;
}
1.4原型模式
如果说抽象工厂是针对工厂的,装饰模式是针对产品的,他们都是针对创建类的类别、功能做文章
原型模式则是在优化创建的过程,加入我们需要大量生产一批产品,就需要大量使用工厂类的创建接口,但是每次我们都需要有一个工厂才能创建。
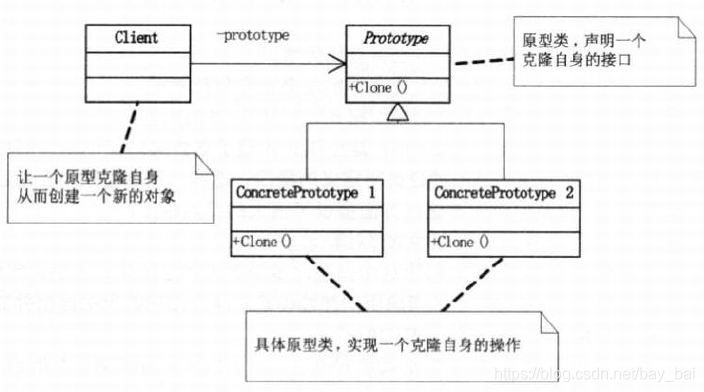
如果,产品可以进行自我复制,就可以省掉创建工厂的步骤。
#include <iostream>
using namespace std;
/*抽象原型类*/
class Student
{
protected:
    int id;
    char name[10];
public:
    virtual Student* Clone() = 0;
    virtual void Show() = 0;
};
/*具体原型类*/
class StudentTypeA :public Student
{
public:
    StudentTypeA(const char* name_input){
        strcpy(name, name_input);
        this->id = 0;
        cout << "Construction....." << endl;
    }
    StudentTypeA(const StudentTypeA& other) {
        cout << "Copy Construction..." << endl;
        this->id = other.id;
        this->id++;
        strcpy(this->name, other.name);
    }
    virtual StudentTypeA* Clone() {
        StudentTypeA* tmp = new StudentTypeA(*this);
        return tmp;
    }
    void Show(){
        cout << "Student id == " << id << " name == " << name << endl;
    }
    ~StudentTypeA() {
        cout << "Deconstruction StudentTypeA" << endl;
    }
};

int main()
{
  Student *student1 = new StudentTypeA("xiaoming");
  Student *student2 = student1->Clone(); //产品的自我复制,省掉了工厂
  Student *student3 = student2->Clone();
  student1->Show();
  student2->Show();
  student3->Show();
  return 0;
}
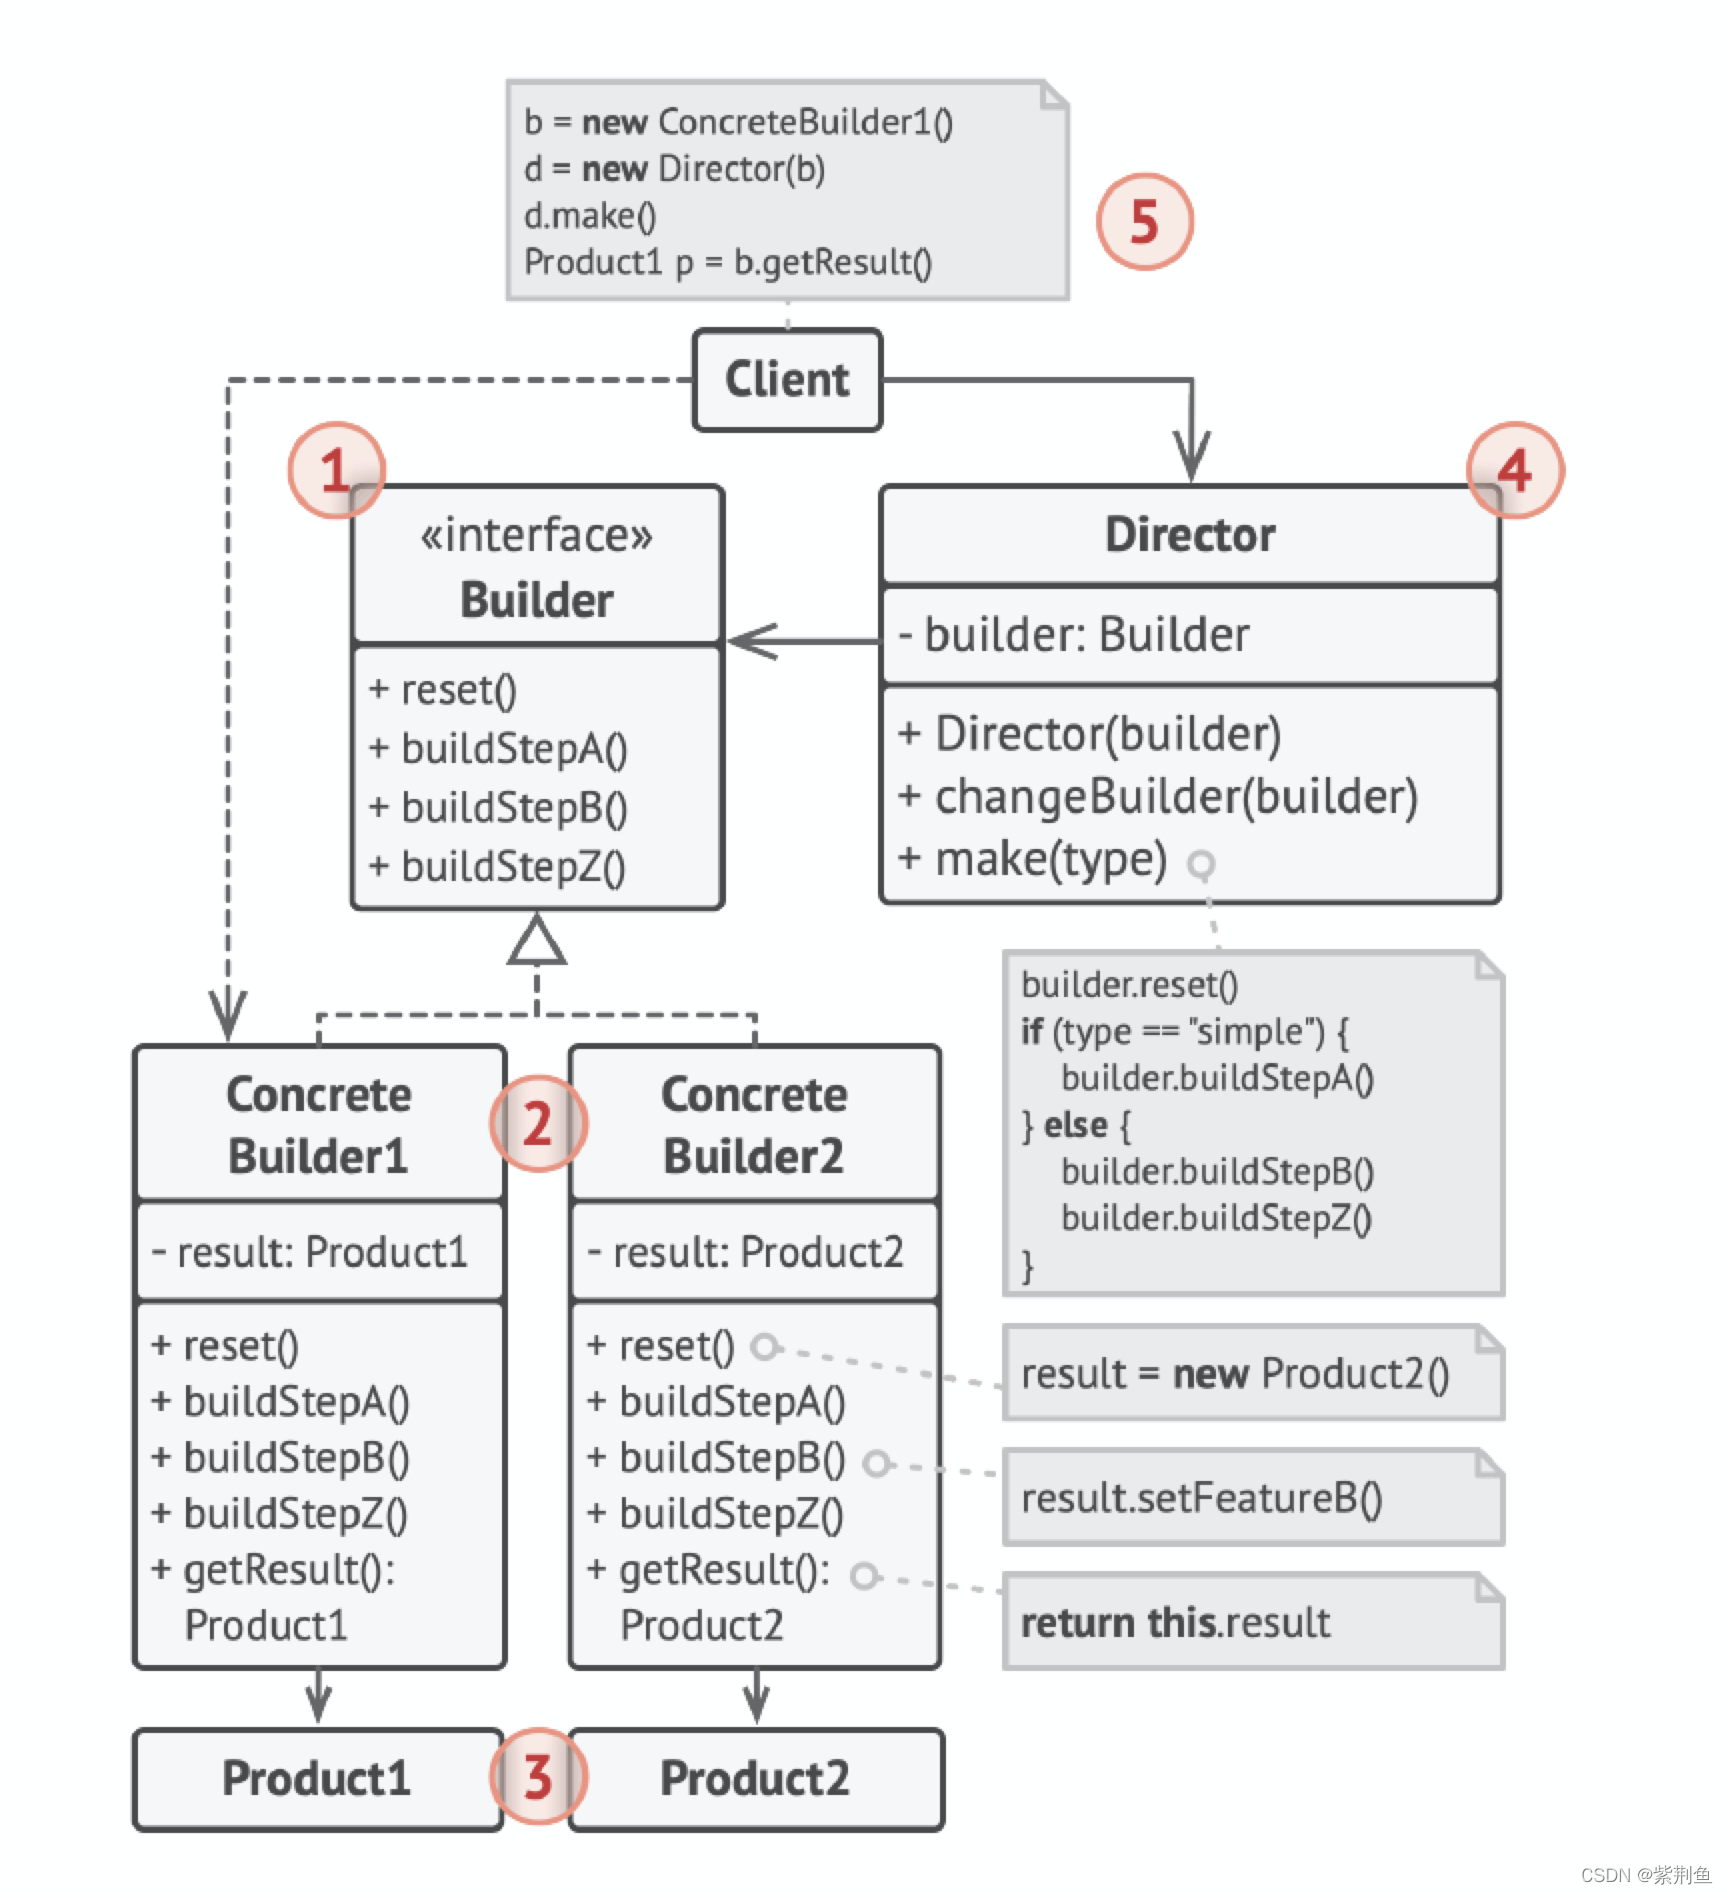
1.5生成器模式
以往我们建造产品,都是需要一次性创建一个完全的产品,而现实生活中,也会有不少产品是通过不同产品拼凑出来的。
如果说因为一点点的不一样就需要不同的工厂,也不太划算
所以我们也要学会生产半成品
同样,我们还是给出示例代码:
#ifndef  PRODUCT_H_
#define  PRODUCT_H_
#include <string>
#include <iostream>
// 产品类 车
class Car {
 public:
    Car() {}
    void set_car_tire(std::string t) {
        tire_ = t;
        std::cout << "set tire: " << tire_ << std::endl;
    }
    void set_car_steering_wheel(std::string sw) {
        steering_wheel_ = sw;
        std::cout << "set steering wheel: " << steering_wheel_ << std::endl;
    }
    void set_car_engine(std::string e) {
        engine_ = e;
        std::cout << "set engine: " << engine_ << std::endl;
    }

 private:
    std::string tire_;            // 轮胎
    std::string steering_wheel_;  // 方向盘
    std::string engine_;          // 发动机
};
#endif  // PRODUCT_H_
#ifndef  BUILDER_H_
#define  BUILDER_H_
#include "Product.h"
// 抽象建造者
class CarBuilder {
 public:
    Car getCar() {
        return car_;
    }
    // 抽象方法
    virtual void buildTire() = 0;
    virtual void buildSteeringWheel() = 0;
    virtual void buildEngine() = 0;
 protected:
    Car car_;
};
#endif  // BUILDER_H_
#ifndef CONCRETE_BUILDER_H_
#define CONCRETE_BUILDER_H_
#include "Builder.h"
// 具体建造者 奔驰
class BenzBuilder : public CarBuilder {
 public:
    // 具体实现方法
    void buildTire() override {
        car_.set_car_tire("benz_tire");
    }
    void buildSteeringWheel() override {
        car_.set_car_steering_wheel("benz_steering_wheel");
    }
    void buildEngine() override {
        car_.set_car_engine("benz_engine");
    }
};
// 具体建造者 奥迪
class AudiBuilder : public CarBuilder {
 public:
    // 具体实现方法
    void buildTire() override {
        car_.set_car_tire("audi_tire");
    }
    void buildSteeringWheel() override {
        car_.set_car_steering_wheel("audi_steering_wheel");
    }
    void buildEngine() override {
        car_.set_car_engine("audi_engine");
    }
};

#endif  // CONCRETE_BUILDER_H_
#ifndef  DIRECTOR_H_
#define  DIRECTOR_H_
#include "Builder.h"
class Director {
 public:
    Director() : builder_(nullptr) {}

    void set_builder(CarBuilder *cb) {
        builder_ = cb;
    }
    // 组装汽车
    Car ConstructCar() {
        builder_->buildTire();
        builder_->buildSteeringWheel();
        builder_->buildEngine();
        return builder_->getCar();
    }

 private:
    CarBuilder* builder_;
};

#endif  // DIRECTOR_H_
#include "Director.h"
#include "ConcreteBuilder.h"
int main() {
    // 抽象建造者(一般是动态确定的)
    CarBuilder* builder;
    // 指挥者
    Director* director = new Director();
    // 产品
    Car car;
    // 建造奔驰
    std::cout << "==========construct benz car==========" << std::endl;
    builder = new BenzBuilder();
    director->set_builder(builder);
    car = director->ConstructCar();
    delete builder;
    // 建造奥迪
    std::cout << "==========construct audi car==========" << std::endl;
    builder = new AudiBuilder();
    director->set_builder(builder);
    car = director->ConstructCar();
    delete builder;
    std::cout << "==========done==========" << std::endl;
    delete director;
}
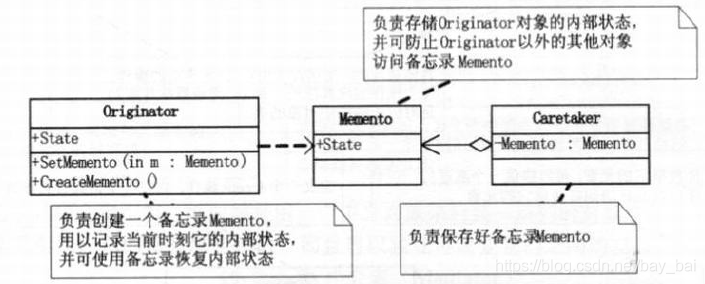
1.6备忘录模式
之前我们聊到的创建模式都是一次性创建和复制相关的工作。
但是,加入一个产品有多个形态,我们想要恢复到之前的创建形态又该怎么办呢
打个快照呗。
实现方式如下:
#ifndef MEMENTO_H_
#define MEMENTO_H_
#include <string>
// 备忘录类保存编辑器的过往状态
class Snapshot {
 public:
    Snapshot(std::string text, int x, int y, double width)
        : text_(text), cur_x_(x), cur_y_(y), selection_width_(width) {}
    std::string get_text() {
        return text_;
    }
    int get_cur_x() {
        return cur_x_;
    }
    int get_cur_y() {
        return cur_y_;
    }
    double get_selection_width() {
        return selection_width_;
    }
 private:
    const std::string text_;
    const int cur_x_;
    const int cur_y_;
    const double selection_width_;
};
#endif  // MEMENTO_H_
#ifndef ORIGINATOR_H_
#define ORIGINATOR_H_
#include <cstdio>
#include <string>
#include <memory>
#include "Memento.h"
// 原发器中包含了一些可能会随时间变化的重要数据
// 它还定义了在备忘录中保存自身状态的方法, 以及从备忘录中恢复状态的方法
class Editor {
 public:
    void setText(std::string text) {
        text_ = text;
    }
    void setCursor(int x, int y) {
        cur_x_ = x;
        cur_y_ = y;
    }
    void setSelectionWidth(double width) {
        selection_width_ = width;
    }
    // 在备忘录中保存当前的状态
    std::shared_ptr<Snapshot> createSnapshot() {
        // 备忘录是不可变的对象, 因此原发器会将自身状态作为参数传递给备忘录的构造函数
        auto res = std::make_shared<Snapshot>(text_, cur_x_, cur_y_, selection_width_);
        printf("创建编辑器快照成功, text:%s x:%d y:%d width:%.2f\n", text_.c_str(), cur_x_, cur_y_, selection_width_);
        return res;
    }
    void resotre(std::shared_ptr<Snapshot> sptr_snapshot) {
        text_ = sptr_snapshot->get_text();
        cur_x_ = sptr_snapshot->get_cur_x();
        cur_y_ = sptr_snapshot->get_cur_y();
        selection_width_ = sptr_snapshot->get_selection_width();
        printf("恢复编辑器状态成功, text:%s x:%d y:%d width:%.2f\n", text_.c_str(), cur_x_, cur_y_, selection_width_);
    }
 private:
    // 文本
    std::string text_;
    // 光标位置
    int cur_x_;
    int cur_y_;
    // 当前滚动条位置
    double selection_width_;
};
#endif  // ORIGINATOR_H_
#ifndef CARETAKER_H_
#define CARETAKER_H_
#include <memory>
#include "Memento.h"
#include "Originator.h"
class Command {
 public:
    explicit Command(Editor* e) : editor_(e) {}
    void makeBackup() {
        backup_ = editor_->createSnapshot();
    }
    void undo() {
        if (backup_) {
            editor_->resotre(backup_);
        }
    }
 private:
    Editor *editor_;
    std::shared_ptr<Snapshot> backup_;
};
#endif  // CARETAKER_H_
#include "Caretaker.h"
int main() {
    // 创建原发器和负责人
    Editor editor;
    Command command(&editor);
    // 定义初始状态
    editor.setText("TOMOCAT");
    editor.setCursor(21, 34);
    editor.setSelectionWidth(3.4);
    // 保存状态
    command.makeBackup();
    // 更改编辑器状态
    editor.setText("KKKK");
    editor.setCursor(111, 222);
    editor.setSelectionWidth(111.222);
    // 撤销
    command.undo();
    return 0;
}
2.层次型模式
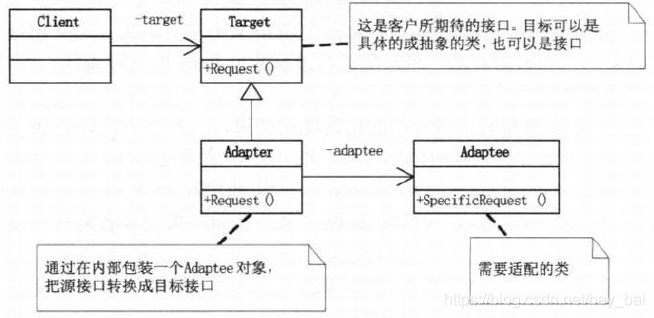
2.1适配器模式
从这一节开始,我们不再仅仅关注一个类如何被创建的问题,而是着手于分层次复用代码。
首先,就介绍一个模式,适配器模式,没错,就是STL里面提到的那个适配器。
它的特点是原有一套核心的功能接口,但是我们需要稍微改动他,去适应新的业务。
所以,我们单独划分一个适配层,将原有的功能接口转接适配出去。这其实有一些类似于我们之前提到的装饰模式。
以下是UML和示例代码;
#ifndef CLIENT_INTERFACE_H_
#define CLIENT_INTERFACE_H_
// 圆钉: 客户端接口, 在C++中定义成抽象基类
class RoundPeg {
 public:
    RoundPeg() {}
    virtual int get_radius() = 0;
};
#endif  // CLIENT_INTERFACE_H_
#ifndef ADAPTER_H_
#define ADAPTER_H_
#include <cmath>
#include "Service.h"
#include "ClientInterface.h"
// 方钉适配器: 该适配器能让客户端将方钉放入圆孔中
class SquarePegAdapter : public RoundPeg {
 public:
    explicit SquarePegAdapter(SquarePeg* sp) : square_peg_(sp) {}
    int get_radius() override {
        return square_peg_->get_width() * sqrt(2) / 2;
    }
 private:
    SquarePeg* square_peg_;
};
#endif  // ADAPTER_H_
#ifndef SERVICE_H_
#define SERVICE_H_
// 方钉: 适配者类, 即和客户端不兼容的类
class SquarePeg {
 public:
    explicit SquarePeg(int w) : width_(w) {}
    int get_width() {
        return width_;
    }
 private:
    int width_;
};
#endif  // SERVICE_H_
#ifndef CLIENT_H_
#define CLIENT_H_
#include "ClientInterface.h"
// 圆孔: 客户端类
class RoundHole {
 public:
    explicit RoundHole(int r) : radius_(r) {}
    int get_radius() {
        return radius_;
    }
    bool isFit(RoundPeg* rp) {
        return radius_ >= rp->get_radius();
    }

 private:
    int radius_;
};
#endif  // CLIENT_H_
#include <iostream>
#include "Client.h"
#include "Adapter.h"
int main() {
    // 半径为10的圆孔
    RoundHole* hole = new RoundHole(10);
    // 半径分别为5和20的大小方钉 + 它们的适配器
    SquarePeg* samll_square_peg = new SquarePeg(5);
    SquarePeg* large_square_peg = new SquarePeg(20);
    SquarePegAdapter* small_square_peg_adapter = new SquarePegAdapter(samll_square_peg);
    SquarePegAdapter* large_square_peg_adapter = new SquarePegAdapter(large_square_peg);
    // hole->isFit(samll_square_peg);  // 编译报错
    // hole->isFit(large_square_peg);  / / 编译报错
    if (hole->isFit(small_square_peg_adapter)) {
        std::cout << "small square peg fits the hole" << std::endl;
    } else {
        std::cout << "small square peg don't fit the hole" << std::endl;
    }
    if (hole->isFit(large_square_peg_adapter)) {
        std::cout << "large square peg fits the hole" << std::endl;
    } else {
        std::cout << "large square peg don't fit the hole" << std::endl;
    }
}
2.2组合模式
组合模式是一种“伪设计模式”,他其实不太有“设计感”
简单来说,我们之前讨论的设计模式,他的各种生产、适配的类之间,一般是一种线性的关系或者是图的关系。
但是,世界上还有一种计算机很喜欢的关系,叫树形关系。
简单来说,我们有一颗多叉树,把父节点当做基类,子节点含有父节点的结构功能,但是叶子节点除外。叶子结点仅仅处理自己这一种情况。
以下是UML和示例代码:
//节点的定义
class Component
{
public:
   virtual void Add(Component *cmpt) = 0;  //添加节点
   virtual void Remove(Component *cmpt) = 0;  //删除节点
   virtual void Operation() = 0;
   virtual ~Component(){}
};

//树节点
class Composite : public Component //既继承
{
private:
    string name;
    list<Component*> elements;//又有组合,这就是设计模式惯用的手法
public:
    Composite(const string & s) : name(s) {}

    virtual void Add(Component* element) {
        elements.push_back(element);
    }
    virtual void Remove(Component* element){
        elements.remove(element);
    }

    virtual void Operation(){
        //1.处理当前的节点
        //2.处理当前节点的叶子节点,如果当前节点的叶子节点是树节点就循环调用
        for (auto &e : elements)
            e->Operation(); //多态调用 (这里是组合模式的精华)
    }
};
//叶子节点
class Leaf : public Component
{
private:
    string name;
public:
    Leaf(string s) : name(s) {}

    virtual void Operation(){
        //处理当前节点
    }
    //注意:叶子节点没有添加和删除节点的功能,这里可以写一个空方法
};

//可以用了
//先写一个调用函数
void Show(Component & c)
{
    c.Operation();
}

int main()
{
    Component *pRoot = new Composite("班长");//根节点

    Component *pPart1 = new Composite("小组长1")//树节点
    pPart1->Add(new Leaf("小明"));
    pPart1->Add(new Leaf("小黄"));

    Component *pPart2 = new Composite("小组长2")//树节点
    pPart2->Add(new Leaf("小花"));
    pPart2->Add(new Leaf("小美"));

    pRoot->Add(pPart1);
    pRoot->Add(pPart2);


    Show(pRoot);//从根节点开始展示
    Show(pPart2);//展示其它节点也没问题

   return 0;
}
2.3桥接模式
咱们之前的层次模式都是一个大类里面,或者是有父子关系的树状结构里面。
而不同功能类之间,要想好好合作,生一个有父母有点的孩子,就需要爱情的桥梁。
那怎么实现呢,首先,要提取父母的基因(对类进行抽象),抽象不同的类组合成一个大的抽象类
然后对它进行实现,或者进行多重实现,具体UML和实例代码如下:
#ifndef ABSTRACTION_H_
#define ABSTRACTION_H_
#include <string>
#include "Implementation.h"
// 抽象类: Pen
class Pen {
 public:
    virtual void draw(std::string name) = 0;
    void set_color(Color* color) {
        color_ = color;
    }
 protected:
    Color* color_;
};
#endif  // ABSTRACTION_H_
#ifndef REFINED_ABSTRACTION_H_
#define REFINED_ABSTRACTION_H_

#include <string>
#include "Abstraction.h"

// 精确抽象类: BigPen
class BigPen : public Pen {
 public:
    void draw(std::string name) {
        std::string pen_type = "大号钢笔绘制";
        color_->bepaint(pen_type, name);
    }
};

// 精确抽象类: SmallPencil
class SmallPencil : public Pen {
 public:
    void draw(std::string name) {
        std::string pen_type = "小号铅笔绘制";
        color_->bepaint(pen_type, name);
    }
};

#endif  // REFINED_ABSTRACTION_H_
#ifndef IMPLEMENTATION_H_
#define IMPLEMENTATION_H_

#include <string>
#include <iostream>

// 实现类接口: 颜色
class Color {
 public:
    virtual void bepaint(std::string pen_type, std::string name) = 0;
};

#endif  // IMPLEMENTATION_H_
#ifndef CONCRETE_IMPLEMENTATION_H_
#define CONCRETE_IMPLEMENTATION_H_

#include <string>
#include "Implementation.h"

// 具体实现类: Red
class Red : public Color {
 public:
    void bepaint(std::string pen_type, std::string name) override {
        std::cout << pen_type << "红色的" << name << "." << std::endl;
    }
};

// 具体实现类: Green
class Green : public Color {
 public:
    void bepaint(std::string pen_type, std::string name) override {
        std::cout << pen_type << "绿色的" << name << "." << std::endl;
    }
};


#endif  // CONCRETE_IMPLEMENTATION_H_
#include "ConcreteImplementation.h"
#include "RefinedAbstraction.h"

int main() {
    // 客户端根据运行时参数获取对应的Color和Pen
    Color* color = new Red();
    Pen* pen = new SmallPencil();

    pen->set_color(color);
    pen->draw("太阳");

    delete color;
    delete pen;
}
3.行为型模式
3.1模板方法
从这里开始,我们已经经历了创建、分层的设计模式,这一次,我们从类的行为本身出发进行设计模式的归纳。
首先要说的就是模板方法。
模板方法简单来说就是定义一个用于继承的方法,然后把方法拆解为不同的小块,这些小块是可以进行重写的。通过重写这些小块,我们就可以重新利用模板方法实现功能。
这种方式既可以保留调用的一致性,也可以最大程度保留原有的逻辑。
//程序库开发人员
class Library {
public:
	void Step1() {
		//...
	}
	void Step3() {
		//...
	}
	void Step5() {
		//...
	}
};

//应用程序开发人员
class Application {
public:
	bool Step2() {
		//...
	}
	void Step4() {
		//...
	}
};

int main()
{
	Library lib;
	Application app;
	lib.Step1();
	if (app.Step2()) {
		lib.Step3();
	}
	for (int i = 0; i < 4; i++) {
		app.Step4();
	}
	lib.Step5();
}
 //程序库开发人员
class Library {
public:
    //稳定 template method
    void Run() {
        Step1();
        if (Step2()) { //支持变化 ==> 虚函数的多态调用
            Step3();
        }
        for (int i = 0; i < 4; i++) {
            Step4(); //支持变化 ==> 虚函数的多态调用
        }
        Step5();
    }
    virtual ~Library() { }
protected:
    void Step1() { //稳定
        //.....
    }
    void Step3() {//稳定
        //.....
    }
    void Step5() { //稳定
        //.....
    }
    virtual bool Step2() = 0;//变化
    virtual void Step4() = 0; //变化
};

//应用程序开发人员
class Application : public Library {
protected:
    virtual bool Step2() {
        //... 子类重写实现
    }
    virtual void Step4() {
        //... 子类重写实现
    }
};

int main()
{
    Library* pLib = new Application();
    pLib->Run();
    delete pLib;
}
3.2观察者模式
观察者模式,这是一个十分有用的模式,可以说不同类的通信很大程度都依赖这个模式。
我们将类分为两种,
一种是被观测者,它在自身发生某一些改动时,大叫一声通知其他人;
一种是观察者,它听见被观测者的叫喊时做出反应。
当然,我们需要给他们都提供一个抽象类
具体的UML和实例代码如下:
#include <iostream>
#include <string>
#include <list>
using namespace std;

class Subject;

//抽象观察者
class Observer
{
protected:
	string name;
	Subject* sub;
public:
	Observer(string name, Subject* sub)
	{
		this->name = name;
		this->sub = sub;
	}
	virtual void update() = 0;
};

//具体的观察者: 看股票的
class StockObserver :public Observer
{
public:
	StockObserver(string name, Subject* sub) :Observer(name, sub)
	{
	}
	void update();
};

//具体的观察者:看NBA的
class NBAObserver :public Observer
{
public:
	NBAObserver(string name, Subject* sub) :Observer(name, sub)
	{
	}
	void update();
};

//抽象通知者
class Subject
{
protected:
	list<Observer*> observers;	//观察者列表
public:
	string action;
	virtual void attach(Observer*) = 0;
	virtual void detach(Observer*) = 0;
	virtual void notify() = 0;
};

//具体通知者:秘书
class Secretary :public Subject
{
public:
	void attach(Observer* observer)
	{
		observers.push_back(observer);
	}

	//删除观察者
	void detach(Observer* observer)
	{
		for (auto iter = observers.begin(); iter != observers.end(); )
		{
			if ((*iter) == observer)
			{
				observers.erase(iter);
			}
			++iter;
		}
	}

	//通知观察者
	void notify()
	{
		for (auto iter = observers.begin(); iter != observers.end(); iter++)
		{
			(*iter)->update();
		}
	}
};
#include "stdafx.h"
#include "Observer.h"

void StockObserver::update()
{
	cout << name << " 股票组: 收到消息:" << sub->action << endl;
	if (sub->action == "总监来了!")
	{
		cout << "股票组: 我马上关闭股票" << endl;
	}
}

void NBAObserver::update()
{
	cout << name << " NBA组: 收到消息:" << sub->action << endl;
	if (sub->action == "总监来了!")
	{
		cout << "NBA组: 我马上关闭NBA" << endl;
	}
}
int main()
{
	Subject* se = new Secretary();	//创建观察者    //被观察的对象
	Observer* o1 = new NBAObserver("NBA001", se);
	Observer* o2 = new NBAObserver("NBA002", se);
	Observer* lm = new StockObserver("股票A", se);

	se->attach(o1);	//加入观察队列
	se->attach(o2);
	se->attach(lm);

	se->action = "出去开会了!";	//事件
	se->notify();
	cout << endl;

	se->action = "总监来了";
	se->notify();
	return 0;
}
3.3状态模式
在讲述状态模式之前,我们已经提到了一种模式:备忘录模式
我们说备忘录模式将会记录当前状态和前一个、后一个状态,进行创建过程中的撤销重做
但是,这样局限的使用场景显然是不够的。我们需要在更多的时候使用更多的状态,甚至让不同的状态拥有不同的行为,这里就需要使用状态模式了。同样,状态可以作为一种抽象,继承自抽象的类执行不同状态的方法。

// 此文件包含 "main" 函数。程序执行将在此处开始并结束。
// 参考大话设计模式 - 状态模式
 #include <iostream>
#ifndef SAFE_DELETE
#define SAFE_DELETE(p) { if(p){delete(p); (p)=NULL;} }
#endif
// 状态模式:存在多种状态,用if else逻辑较为繁琐时,可采用状态模式进行管控
// 注意:内存泄露问题
using namespace std;
class Work;
class FornoonState;
class State {
public:
	virtual void writeProgram(Work* work) = 0;
};
class Work {
public:
	Work();
	~Work() {
		SAFE_DELETE(state_);
	}
	void setHour(int hour) {
		hour_ = hour;
	}
	int getHour() {
		return hour_;
	}
 	void setFinish(bool finish) {
		finish_ = finish;
	}
	int getFinish() {
		return finish_;
	}
 	// 此处注意内存泄露
	void setState(State* state) {
		SAFE_DELETE(state_);
		state_ = state;
	}
	void getCurrentState() {
		state_->writeProgram(this);
	}
 private:
	int hour_ = 0;
	bool finish_ = false;
	State* state_ = nullptr;
};
 class SleeptimeState : public State {
public:
	void writeProgram(Work* work) {
		cout << "time: " << work->getHour() << ", can not work ,need sleep" << endl;
	}
};
 class GohomeState : public State {
public:
	void writeProgram(Work* work) {
		work->setFinish(true);
	}
};
 class NigthtimeState : public State {
public:
	void writeProgram(Work* work) {
		if (work->getFinish()) {
			cout << "time: " << work->getHour() << ", work done, go home" << endl;
			work->setState(new GohomeState());
		}
		else {
			if (work->getHour() < 21) {
				cout << "time: " << work->getHour() << ", work very tired." << endl;
			}
			else {
				work->setState(new SleeptimeState());
				work->getCurrentState();
			}
		}
	}
};

class AfternoonState : public State {
public:
	void writeProgram(Work* work) {
		if (work->getHour() < 19) {
			cout << "time: " << work->getHour() << ", work tired." << endl;
		}
		else {
			work->setState(new NigthtimeState());
			work->getCurrentState();
		}
	}
};
 class NoontimeState : public State {
public:
	void writeProgram(Work* work) {
		if (work->getHour() < 14) {
			cout << "time: " << work->getHour() << ", work hungry." << endl;
		}
		else {
			work->setState(new AfternoonState());
			work->getCurrentState();
		}
	}
};
 class FornoonState : public State {
public:
	void writeProgram(Work* work) {
		if (work->getHour() < 12) {
			cout << "time: " << work->getHour() << ", work wonderful." << endl;
		} else {
			work->setState(new NoontimeState());
			work->getCurrentState();
		}
	}
};

Work::Work() {
	state_ = new FornoonState();
}

int main()
{
	Work* work = new Work();
 	work->setHour(8);
	work->getCurrentState();
 	work->setHour(9);
	work->getCurrentState();
 	work->setHour(12);
	work->getCurrentState();
 	work->setHour(15);
	work->getCurrentState();
 	work->setHour(17);
	work->getCurrentState();
 	work->setHour(19);
	work->getCurrentState();
	work->setFinish(true);
	work->getCurrentState();
	work->setHour(21);
	work->getCurrentState();
	SAFE_DELETE(work);
	return 0;
}
3.4命令模式
每一条命令可以被理解为一条指令(具体指令实现继承于抽象的指令),用户通过各种输入来启动指令,指令启动执行完成之后,将结果返回给一个类,最总控制权交还给用户。

#include <iostream>
using namespace std;
#define SAFE_DELETE(p) if (p) { delete p; p = NULL; }
class Receiver
{
public:
     void Action()
     {
          cout<<"Receiver->Action"<<endl;
     }
};
class Command
{
public:
     virtual void Execute() = 0;
};
class ConcreteCommand : public Command
{
public:
     ConcreteCommand(Receiver *pReceiver) : m_pReceiver(pReceiver){}
     void Execute()
     {
         m_pReceiver->Action();
     }
private:
     Receiver *m_pReceiver;
};
 class Invoker
{
public:
     Invoker(Command *pCommand) : m_pCommand(pCommand){}
     void Invoke() {
          m_pCommand->Execute();
     }
private:
    Command *m_pCommand;

};
int main()
{
     Receiver *pReceiver = new Receiver();
     Command *pCommand = new ConcreteCommand(pReceiver);
     Invoker *pInvoker = new Invoker(pCommand);
     pInvoker->Invoke();
     SAFE_DELETE(pInvoker);
     SAFE_DELETE(pCommand);
     SAFE_DELETE(pReceiver);
     return 0;
}
4.结构型模式
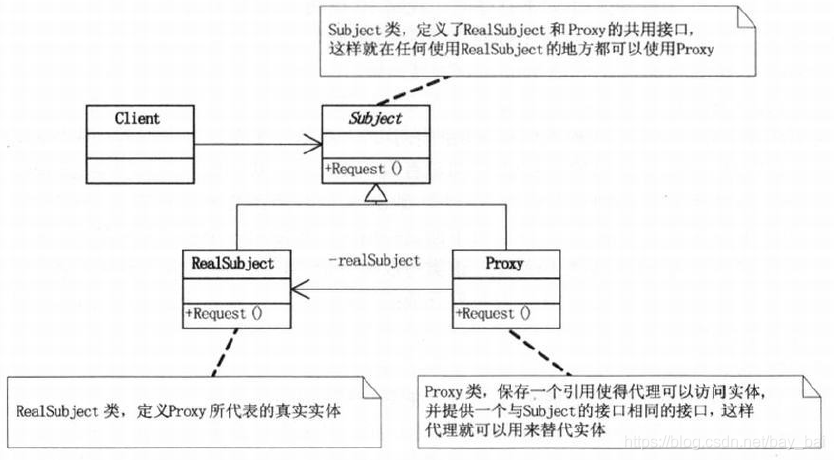
4.1代理模式
如果我们每次操作一个类,都需要直接地调用它的方法,那这可能是繁琐而且没有设计感的。
所以,我们可以将需要操作的类中同事放入真正的类和一个代理类,每次我们想要操作真正的类,都可以通过代理。这样干净又卫生,就像科学上网一样。
#ifndef SERVICE_INTERFACE_H_
#define SERVICE_INTERFACE_H_

#include <string>

// 远程服务接口
class ThirdPartyTVLib {
 public:
    virtual std::string listVideos() = 0;
    virtual std::string getVideoInfo(int id) = 0;
};

#endif  // SERVICE_INTERFACE_H_
#ifndef SERVICE_H_
#define SERVICE_H_

#include <string>
#include "ServiceInterface.h"

// 视频下载类
// 该类的方法可以向远程视频后端服务请求信息, 请求速度取决于用户和服务器的网络状况
// 如果同时发送大量请求, 即使所请求的信息一模一样, 程序的速度依然会变慢
class ThirdPartyTVClass : public ThirdPartyTVLib {
 public:
    std::string listVideos() override {
        // 向远程视频后端服务发送一个API请求获取视频信息, 这里忽略实现
        return "video list";
    }

    std::string getVideoInfo(int id) override {
        // 向远程视频后端服务发送一个API请求获取某个视频的元数据, 这里忽略实现
        return "video info";
    }
};

#endif  //  SERVICE_H_
#ifndef PROXY_H_
#define PROXY_H_

#include <string>
#include "ServiceInterface.h"

// 为了节省网络带宽, 我们可以将请求缓存下来并保存一段时间
// 当代理类接受到真实请求后才会将其委派给服务对象
class CachedTVClass : public ThirdPartyTVLib {
 public:
    explicit CachedTVClass(ThirdPartyTVLib* service) : service_(service), need_reset_(false), list_cache_(""), video_cache_("") {}
    void reset() {
        need_reset_ = true;
    }

    std::string listVideos() override {
        if (list_cache_ == "" || need_reset_) {
            list_cache_ = service_->listVideos();
        }
        return list_cache_;
    }

    std::string getVideoInfo(int id) override {
        if (video_cache_ == "" || need_reset_) {
            video_cache_ = service_->getVideoInfo(id);
        }
        return video_cache_;
    }

 private:
    ThirdPartyTVLib* service_;
    std::string list_cache_;
    std::string video_cache_;
    bool need_reset_;
};

#endif  // PROXY_H_
#ifndef CLIENT_H_
#define CLIENT_H_

#include <string>
#include <cstdio>
#include "Service.h"

// 之前直接与服务对象交互的 GUI 类不需要改变, 前提是它仅通过接口与服务对象交互。
// 我们可以安全地传递一个代理对象来代替真实服务对象, 因为它们都实现了相同的接口。
class TVManager {
 public:
    explicit TVManager(ThirdPartyTVLib* s) : service_(s) {}
    void renderVideoPage(int id) {
        std::string video_info = service_->getVideoInfo(id);
        // 渲染视频页面, 这里忽略实现
        printf("渲染视频页面: %s\n", video_info.c_str());
        return;
    }
    void renderListPanel() {
        std::string videos = service_->listVideos();
        // 渲染视频缩略图列表, 这里忽略实现
        printf("渲染视频缩略图列表: %s\n", videos.c_str());
        return;
    }

 private:
    ThirdPartyTVLib* service_;
};

#endif  // CLIENT_H_
#include "Client.h"
#include "Service.h"
#include "Proxy.h"

int main() {
    ThirdPartyTVClass* aTVService = new ThirdPartyTVClass();
    CachedTVClass* aTVProxy = new CachedTVClass(aTVService);
    TVManager* manager = new TVManager(aTVProxy);

    manager->renderVideoPage(1);
    manager->renderListPanel();

    delete aTVService;
    delete aTVProxy;
    delete manager;
}
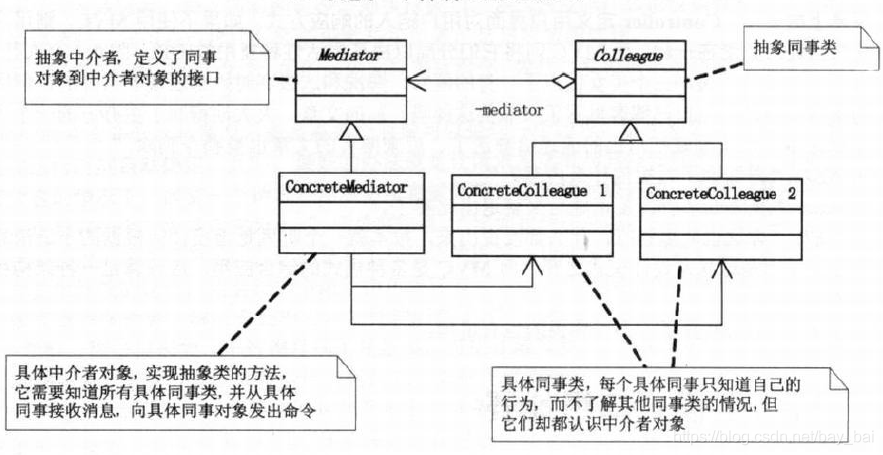
4.2中介模式
这是最不值得讲的一个模式。简而言之,采用一个中介对象来封装一系列的对象交互。使得各个对象不需要显式的相互引用,达到解耦的效果。
就像名字一样,需要一个中介。
#include <iostream>
#include <string>
using namespace std;

class HousePerson;
class BuyHousePerson;
class SellHousePerson;

//抽象中介类
class Mediator{
public:
	virtual void sendMessage(string msg, HousePerson *p) = 0;
};

//抽象炒房客
class HousePerson{
public:
	HousePerson(Mediator *mediator)
	{
		m_mediator = mediator;
	}
protected:
	Mediator *m_mediator;
};

//买房的人
class BuyHousePerson :public HousePerson
{
public:
	BuyHousePerson(Mediator *mediator) :HousePerson(mediator){}
	void sendMsg(string msg)
	{
		m_mediator->sendMessage(msg,this);
	}
	void notify(string msg)
	{
		cout << "买房者得到消息:" << msg << endl;
	}
};

//卖房的人
class SellHousePerson :public HousePerson
{
public:
	SellHousePerson(Mediator *mediator) :HousePerson(mediator){}
	void sendMsg(string msg)
	{
		m_mediator->sendMessage(msg, this);
	}
	void notify(string msg)
	{
		cout << "卖-房者得到消息:" << msg << endl;
	}
};

//具体中介类
class ConcreteMediator :public Mediator
{
public:
	void sendMessage(string msg, HousePerson *p)
	{
		if (p == bh)
		{
			sh->notify(msg);
		}
		else
		{
			bh->notify(msg);
		}
	}

public:
	BuyHousePerson *bh;
	SellHousePerson *sh;
};

//客户端
int main()
{
	ConcreteMediator *pM = new ConcreteMediator;
	BuyHousePerson *pBh = new BuyHousePerson(pM);
	SellHousePerson* pSh = new SellHousePerson(pM);

	pM->bh = pBh;
	pM->sh = pSh;

	pBh->sendMsg("卖不卖,一口价780W");
	pSh->sendMsg("不卖,至少800W!");

	if (pM)
	{
		delete pM;
		pM = nullptr;
	}
	if (pBh)
	{
		delete pBh;
		pBh = nullptr;
	}
	if (pSh)
	{
		delete pSh;
		pSh = nullptr;
	}

	return 0;
}
4.3享元模式
我们早就说过,设计模式的一大功能便是尽可能的复用代码,从建造到调用都是。
但是,我们往往会隔离不同的独立类,或者说,有限的复用独立类之间的代码。但是,有时候,我们的业务需求是轻微改动一个类,并要求它在逻辑上是独立运行的。
这个时候,我们就需要复用代码大师,享元模式了。
享元模式其实原理不难,在共同的父类中,实现需要公用的代码,需要时直接调用。

class Flyweight
{
public:
	virtual void Operation() = 0;
};
class ConcreteFlyweight : public Flyweight
{
public:
	void Operation() {};
};
class UnshareConcreteFlyweight : public Flyweight
{
public:
	void Operation() {};
};

class FlyweightFactory
{
public:
	FlyweightFactory() { confly = nullptr; uncfly = nullptr; }
	~FlyweightFactory() { delete confly; delete uncfly; }
	void GetFlyweight()
	{
		if (confly == nullptr)
			confly = new ConcreteFlyweight();
		confly->Operation();

		if (uncfly == nullptr)
			uncfly = new UnshareConcreteFlyweight();
		uncfly->Operation();
	}
private:
	Flyweight* confly;
	Flyweight* uncfly;
};
int main()
{
	FlyweightFactory flyfac;
	flyfac.GetFlyweight();
	return 0;
}
参考资料:
《大话设计模式》
《设计模式 可复用面向对象软件的基础》
Q.E.D.